Tcx Pantone Converter Instant
The BCD Store file is usually located in the Boot folder of a Windows 7/8.1/10 OS's System Reserved partition; which in many cases will not even have a drive letter assigned to it. So if you really want to see where these system files are located, you'll first need to go into Disk Management and give that partition a drive letter. (Note: Some OS distributions, such as the 'Embedded Standard' editions, do not have a separate System Reserved partition.) Apart from possibly needing to add a drive letter, all system files are by default hidden from view, so you'll also need to change the Folder Settings to show hidden system files. But, since the BCD file is kept open by the OS, you wouldn't be able to open it to look at it anyway! However, you can use the BCDEDIT program to make a backup copy of the BCD file which you can then open with a hex editor (to see everything) or even NOTEPAD (to see all the readable characters). [Contents of a real BCD file are linked below.]
Tcx Pantone Converter Instant
If you enter "bcdedit" at a simple Command Prompt window, you'll probably see:
The boot configuration data store could not be opened. Access is denied. |
Because you need Administrator privileges to access the BCD file with BCDEDIT. So, be sure to run the Command Prompt ![]() using a RIGHT-CLICK and selecting:
using a RIGHT-CLICK and selecting: ![]() ("Run as administrator").
("Run as administrator").
The following is what you would typically see when entering the command bcdedit all by itself:
C:\>bcdedit

Windows Boot Manager
--------------------
identifier              {bootmgr}
device                  partition=\Device\HarddiskVolume1
description             Windows Boot Manager
locale                  en-US
inherit                 {globalsettings}
default                 {current}
resumeobject            {ad68f292-2870-11e3-9c80-856fbacd7f33}
displayorder            {current}
toolsdisplayorder       {memdiag}
timeout                 30

Windows Boot Loader
-------------------
identifier              {current}
device                  partition=C:
path                    \Windows\system32\winload.exe
description             Windows 7
locale                  en-US
inherit                 {bootloadersettings}
recoverysequence        {ad68f294-2870-11e3-9c80-856fbacd7f33}
recoveryenabled         Yes
osdevice                partition=C:
systemroot              \Windows
resumeobject            {ad68f292-2870-11e3-9c80-856fbacd7f33}
nx OptIn |
Note that the Boot Manager program (bootmgr) is often located in a volume without a drive letter, such as in this example, but it could have one. If there were only one partition on the drive, then it would appear in the C: partition.
The following is a dump of a Windows™ 7/8 (or Vista) Administrator console (Command Prompt window) after entering "help bcdedit" ("bcdedit /?" will give the same):
BCDEDIT - Boot Configuration Data Store Editor

The Bcdedit.exe command-line tool modifies the boot configuration data store.
The boot configuration data store contains boot configuration parameters and
controls how the operating system is booted. These parameters were previously
in the Boot.ini file (in BIOS-based operating systems) or in the nonvolatile
RAM entries (in Extensible Firmware Interface-based operating systems). You can
use Bcdedit.exe to add, delete, edit, and append entries in the boot
configuration data store.

For detailed command and option information, type bcdedit.exe /? <command>. For
example, to display detailed information about the /createstore command, type:

     bcdedit.exe /? /createstore

For an alphabetical list of topics in this help file, run "bcdedit /? TOPICS".

Commands that operate on a store
================================
/createstore    Creates a new and empty boot configuration data store.
/export         Exports the contents of the system store to a file. This file
                can be used later to restore the state of the system store.
/import         Restores the state of the system store using a backup file
                created with the /export command.

Commands that operate on entries in a store
===========================================
/copy           Makes copies of entries in the store.
/create         Creates new entries in the store.
/delete         Deletes entries from the store.

Run bcdedit /? ID for information about identifiers used by these commands.

Commands that operate on entry options
======================================
/deletevalue    Deletes entry options from the store.
/set            Sets entry option values in the store.

Run bcdedit /? TYPES for a list of datatypes used by these commands.
Run bcdedit /? FORMATS for a list of valid data formats.

Commands that control output
============================
/enum           Lists entries in the store.
/v              Command-line option that displays entry identifiers in full,
                rather than using names for well-known identifiers.
                Use /v by itself as a command to display entry identifiers
                in full for the ACTIVE type.

Running "bcdedit" by itself is equivalent to running "bcdedit /enum ACTIVE".

Commands that control the boot manager
======================================
/bootsequence   Sets the one-time boot sequence for the boot manager.
/default        Sets the default entry that the boot manager will use.
/displayorder   Sets the order in which the boot manager displays the
                multiboot menu.
/timeout        Sets the boot manager time-out value.
/toolsdisplayorder  Sets the order in which the boot manager displays
                    the tools menu.

Commands that control Emergency Management Services for a boot application
==========================================================================
/bootems        Enables or disables Emergency Management Services
                for a boot application.
/ems            Enables or disables Emergency Management Services for an
                operating system entry.
/emssettings    Sets the global Emergency Management Services parameters.

Command that control debugging
==============================
/bootdebug      Enables or disables boot debugging for a boot application.
/dbgsettings    Sets the global debugger parameters.
/debug          Enables or disables kernel debugging for an operating system
entry. |
Note: What you see above is exactly how a Vista/Win7/8 display appears; and, yes, the word "Command" in the last heading was spelled wrong by Microsoft, it should be plural (Commands) just like all the others. And if there really was only one, then the word "control" should have had an 's' after it! This was still true for a Windows 7 SP1 install we examined, and even Windows 8.1. Is this a case of "If it ain't broke, don't fix it!"? Apparently, the cost of qualifying a revised program outweighs this grammatical error.
And even though Windows™ 10 added six new commands (shown in white below), they doubled the same grammatical error (shown in red). Now it's incorrect for both of the last two command types:
Tcx Pantone Converter Instant
Therefore, the digital converter is best used as a . The final approval must always be a physical TCX swatch held under the intended lighting. The converter bridges the distance between continents and screens, but it cannot replace the biological sophistication of the human retina. The Future: Augmented Reality and AI Prediction The evolution of the TCX converter is moving toward augmented reality (AR) and machine learning. New apps now allow a designer to point a smartphone camera at a physical object—a flower petal, a weathered brick, an old velvet curtain—and instantly receive the nearest TCX code. More advanced AI converters are being trained to predict how a TCX color will appear on alternative materials (linen, silk, recycled polyester) without requiring physical dyeing. This "virtual strike-off" capability promises to reduce sample waste by up to 70%, aligning the color industry with sustainability goals. Conclusion The TCX Pantone converter is far more than a simple chart or a digital slider. It is a sophisticated calibration engine that respects the physical reality of dye chemistry and the subjective psychology of human vision. By creating a standardized, reproducible link between the infinite colors of the digital screen and the finite, achievable colors of dyed cotton, the converter empowers designers to fail less, communicate more clearly, and manufacture with confidence. In a globalized economy where a color decision made in a New York studio will be realized in a Shanghai factory and sold in a Tokyo boutique, the TCX converter stands as a quiet, indispensable hero—proving that when vision and reality need a translator, color, like language, requires a precise grammar.
For home goods, the converter ensures cross-material consistency. A sofa manufacturer might need the velvet upholstery to match the cotton throw pillows to the polyester area rug. By converting each material’s limitations to a common TCX reference point, the designer can ensure that despite different fibers and weaves, the overall room achieves chromatic harmony. However, a TCX Pantone converter is not magic; it is a data-driven recommendation engine. Several limitations persist. First, lighting conditions : A converter cannot fix poor display calibration. A designer using an uncalibrated laptop will get a TCX number that looks wrong under a showroom’s halogen track lighting. Second, material texture : The converter assumes a standard cotton poplin weave. A shiny satin, a nubby tweed, or a deep-pile velvet will reflect light differently, making the exact same TCX dye look darker, lighter, or more lustrous. Third, dye lots : Even with a TCX number, a dye batch from one factory may vary slightly from another due to water pH or temperature. Professional converters include tolerance warnings (e.g., "±0.5 ΔE possible"). tcx pantone converter
In the world of design, color is not merely an aesthetic choice; it is a critical language of communication, branding, and emotion. A slight variation in hue can mean the difference between a product flying off the shelf or being relegated to the clearance bin. To manage this delicate language, the Pantone Matching System (PMS) has reigned as the global standard. However, within the specific, tactile realm of fashion, home furnishings, and interior textiles, the standard paper-based Pantone swatch is insufficient. Here, the Pantone TCX (Textile Cotton eXtended) system becomes paramount. Consequently, the TCX Pantone Converter —whether a physical tool, a digital algorithm, or a software feature—has emerged as an indispensable instrument for translating the abstract poetry of color into the precise, reproducible prose of fabric. The Genesis of TCX: Why Cotton Matters To appreciate the converter, one must first understand its subject. Standard Pantone colors (e.g., PMS 185 C) are formulated using ink on coated paper. Paper reflects light differently than woven cotton, polyester, or linen. A vibrant red on a glossy brochure may appear dull, muddy, or overly fluorescent when printed on a t-shirt. The TCX system addresses this by dyeing actual 100% cotton swatches. The "T" stands for Textile, the "C" for Cotton, and the "X" indicates an extended range of over 2,600 colors specifically optimized for soft goods. A TCX converter, therefore, is not simply a lookup table; it is a functional translator that allows a designer to ask: "If this digital RGB color becomes a cotton t-shirt, what Pantone number will it match?" The Mechanics of Conversion: From Physics to Digital Code The TCX Pantone converter operates at the intersection of physics, optics, and data science. At its core, the converter relies on a spectral database. Each TCX color has a unique spectral reflectance curve—a fingerprint of how the fabric absorbs and reflects wavelengths of light. When a designer inputs a color value (e.g., HEX #D2002C or CMYK 0/100/80/5), the converter performs a mathematical operation known as the Delta E (ΔE) calculation . Therefore, the digital converter is best used as a
The converter scans its library of thousands of physical TCX swatches, searching for the color with the smallest perceptible difference to the input. A ΔE of less than 1.0 is considered imperceptible to the human eye. Advanced digital converters (such as those found in Adobe Illustrator plugins or dedicated software like Pantone Color Manager) also account for metamerism—the phenomenon where a color changes under different light sources (daylight vs. fluorescent). Thus, the converter does not just find "a close color"; it finds the cotton-dyed color that remains stable across the environments where garments and furniture are actually used. The true value of the TCX converter is revealed along the global supply chain. Consider a scenario: A Nike sportswear designer in Portland creates a shoe upper using a digital RGB color on a screen. That screen is uncalibrated. The designer uses a TCX converter to lock that screen color to Pantone 19-4052 TCX (Classic Blue) . The designer then sends the TCX number to a textile mill in Vietnam. The mill pulls a physical cotton swatch from its TCX library, dyes a batch of fabric, and ships a "strike-off" back to Portland. The physical swatch matches the original vision. Without the converter, the mill might receive a vague description ("deep ocean blue") or an unprintable RGB file, leading to costly misprints, wasted fabric, and delays of weeks. The Future: Augmented Reality and AI Prediction The
BCD Editor EXAMPLES:
If you ask for help on the "/export" switch, you'll see:
C:\>bcdedit /export /?

bcdedit /export <filename>

This command exports the contents of the system store into a file.  This file
can be used later to restore the state of the system store.  This command is
only valid for the system store.

<filename>          The filename to be used as the destination for the export.
                    If the filename contains spaces, it must be enclosed in
                    quotation marks ("").

Example:

The following command exports the system store to the specified file:

bcdedit /export "C:\Data\BCD Backup" |
So we tried the following and saw it was successful:
C:\>bcdedit /export "C:\Users\<your user name>\Documents\bcdtemp.bin" The operation completed successfully. |
After examining this backup file in our Documents folder (using HxD), our first reaction was: "Man,
this thing appears to be full of all kinds of needless 'gunk'!" It even saves the path and filename to this backup file, inside the file
itself!
Then we compared it to the original BCD file by making a copy of that file while the OS was offline (connected as a slave drive to a
different OS), and found there were MANY differences! So, the 'backup copy' is not really a true copy. And the differences go well beyond simply
changing the path name of its location.
So why is this file so 'cluttered' compared to the Windows XP boot.ini file? Its first 4 bytes
are a big clue: "regf". Reason: The BCD file has the same format as a Windows Registry hive! (For example, the NTUSER.DAT
file begins with the same 4 bytes.) And in fact, once a Windows Vista/7/8 OS has actually started booting-up, it loads the BCD file into the Windows Registry
at: HKEY_LOCAL_MACHINE\BCD00000000.
BOOTMGR Experiments:
What happens if we change the NT Disk Signature on a Windows 7 disk drive?
To test this, we used a disk editor to alter the bytes at offsets 0x1B8 through 0x1BB in the MBR (first sector of the disk drive) by simply adding 1 to each byte. If you attempt to boot a PC after doing that, you'll see the following BLACK error screen:
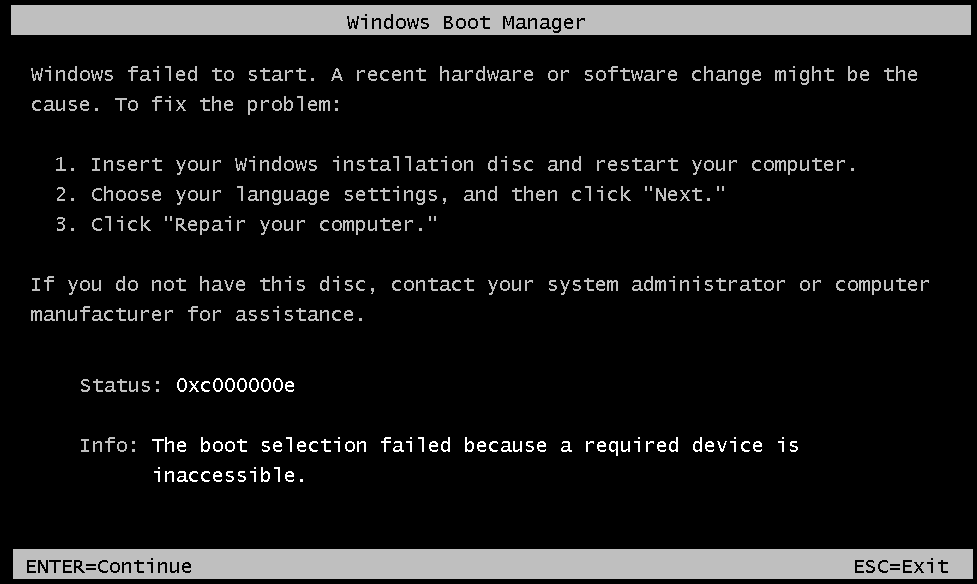
In previous Windows versions, the OS would still boot up this way; even though there was the
possibility some program that used the Disk Signature could then have problems. Note: The same error message, with Status: code of 0xc000000e,
will also be displayed if we change those NT Sig. bytes to all zeros! Only if you edit these bytes back to their original values will the PC boot-up again.
It's also possible to see such an error if your PC is somehow directed to start booting from a drive other than the normal boot drive, and the BCD
Store on that drive points to the first drive, which will obviously contain a different Disk Sig. than what is stored in that drive's BCD. Most PC BIOS have
a 'Boot Menu' (often accessible using the F12 key at boot-up) which temporarily makes whatever drive you select, be the first drive on the PC, so a
Windows 7, 8.1 or 10 OS on that drive will not have this error! (Note: Unless you plan on always keeping an original Windows OS drive
and a new Windows OS drive both connected to your PC, you should never do a new OS install with any other drives connected
to the PC!) Why? Because new Windows OS installs often make changes to a primary disk drive, even when installed to a secondary drive! Disconnect all
but the disk drive you intend to install a new Win OS on, and in the future you will be able to boot-up the new drive all by itself (or using a Boot Menu key)
without it depending upon some primary disk drive you decided to remove, or that has failed.
NOTE: The error shown above is a function of the bootmgr program! We know this, because the same error message will be displayed after
altering the NT Disk Signature on a drive that has had its entire C: Volume (where the actual Windows OS resides) removed! So, the Boot
Manager must check the NT Disk Signature before it even looks for the presence of the C: Volume.
But how does bootmgr know what those hex
bytes should be?
Answer: After examining both our copy and the original BCD file, we found the NT Disk Signature there, in the same
order as found in the MBR Sector, no less than 9 times. For our small test install of a new Windows 7 OS, this shows
where those bytes occurred (highlighted with a pink background color); along with all the other data contained in a BCD Store file.
Note: The \Boot folder of your System Reserved partition will also contain a few LOG files: BCD.LOG, BCD.LOG1 and BCD.LOG2, but the numbered files are often empty. This LOG file is a copy of the BCD file, having the same location
written inside it and all the general indications of a BCD Registry file, but about half its bytes may be different.
Have fun examining your own backup BCD copy.
Why is it so difficult to move the C: Volume under Windows 7 or later?
To clarify: Under most previous Windows installs, such as Windows 98, people who performed multi-booting or simply had many different partitions on their
PCs often used a program called Partition Magic to shrink or even completely rearrange the layout of partitions on their disk drives. But attempting
to change where the C: Volume begins under Windows 7 results in a similar BLACK screen error as above; including the same exact message: "Info: The boot selection failed because a required device is inaccessible." But with a different code: "Status: 0xc0000225."
[Note: This is true whether the correct location
is specified in the Partition Table or not; same Status code will be shown in either case. In fact, we doubt that bootmgr even looks at the
Partition Table, provided it can find the C: volume where it is supposed to be!]
This problem is similar to the one above (concerning the NT
Disk Signature), but involves the exact sector location of the C: drive's partition.
So where in the BCD file, is the sector location of the
Windows Boot Sector stored?
The reason for the question being: Although we can find our drive's NT Disk Signature in the BCD Store, we can
not find a sector location for the C: drive! Before searching, we had thought only the
BCD file would need to be updated if we moved the C: Volume. We knew how partitions are referenced in a Windows REGISTRY (see NTFS Disk Signature), but could not find any similar bytes; other than the 4 bytes of the NT Disk Sig., in our BCD file! So how
does bootmgr know where the sector offset location of a C: drive should be, and prevent booting from an OS volume we simply moved and did
not resize; even though the data in both the Partition Table and its Boot Sector (Hidden Sectors which give us sector offset to Boot Sector) have
already been updated?
NOTE: All of the following is still under construction . . . mainly because we have yet to find a solution that allows one to effectively move where a Windows 7 OS's C: drive partition begins! After using a Microsoft install DVD to REPAIR such a drive, although it did allow us to boot-up that drive and use it, the repair did not change anything permanently! After attempting to boot-up the drive again, the same error message is displayed, no matter how many times we used the DVD to 'repair' the drive!!.
Could it be as simple as the OS already having accessed the REGISTRY; with much of the system already running in Memory, it then finds the offset stored
there does not match the values in the Partition Table and/or Boot Sector, so it gives us essentially a false message, stating: "The boot selection
failed because a required device is inaccessible."? Yet, the bootmgr program could only know that if it did find and
access the Registry.
Other Experiments:
2. We next carried out the following steps on a copy of our Windows 7 OS install in order to verify our theory about why Windows 7 does this:
A) Copy the hidden file bootmgr and various folders (including "Boot\enUS" and "Boot\Fonts") from the
"System Reserved" partition to the root directory of the C:\ drive. Note: Five or six files must be 'skipped' when doing this, because the
BCD Store (and associated files) will remain in use by the OS (preventing them from being copied)!
B) Create a copy of the BCD file
in C:\Boot by using this command (as Administrator): bcdedit /export C:\Boot\BCD
C) Change the
MBR Sector, so the main OS partition is the 'Active' partition.
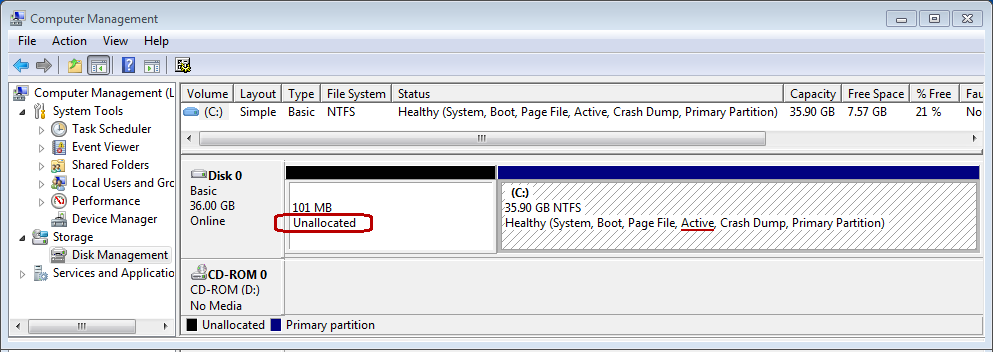
After that we were able to boot-up the OS from only the C: drive. In order to prove
this is true, we used HxD to zero-out the entry in the Partition Table for the System Reserved partition. (Note: The reason we did not
use Windows to 'delete' the partition, is because that could have ruined being able to access it again in the future. By saving those hex bytes elsewhere
and zero-filling the entry, we can simply enter those bytes in the table again, in order to restore and access the partition!) Upon rebooting and opening
the Disk Management utility, one can graphically see this is true:
D) We shrank the size of this Volume (C:) to only 8 GB in order to run the next test below.
What about BOOTSTAT.DAT and BOOTSECT.BAK files?
E) shift the beginning of the C: drive to where the System Reserved partition had been, by correcting the data in both the
Boot Sector (VBR) and the Partition Table; not to mention, actually moving the Boot Sector and its following Volume Boot Record sectors as well